Monday, January 31, 2011
Spicy Tomato and Blue Cheese Soup
You would think that after spending a glorious afternoon sampling Wisconsin craft beers and artisanal cheeses at the Isthmus Beer and Cheese Fest on Saturday, I'd be ready to take a bit of a break from cheese. Rather than getting sick of cheese (and beer), I'm even more enthusiastic about incorporating it into my diet. Grilled cheese is a regular part of my diet, accompanied most frequently by tomato soup. I've never tried making my own tomato soup before, but I've had this recipe bookmarked in Michael Symon's Live to Cook since I checked out from the library.
This soup is much more complex in the flavor than your average tomato soup. Each bite takes you on a little flavor journey, starting with the fresh tomato flavor, followed by a punch of heat from the sriracha, and finished with the smooth, creamy blue cheese, an atypical, yet amazing ingredient. This soup is definitely spicy, and those that like their food mild should cut back on the sriracha sauce, or perhaps serve the soup with sour cream to cut the heat. I served the soup with grilled cheese sandwiches made with Forgotten Valley smoked butterkase; the smoky cheese was the perfect foil to the spice, although any grilled cheese would be lucky to be dunked in this soup.
Spicy Tomato and Blue Cheese Soup
adapted from Michael Symon's Live to Cook
serves 4 to 6
2 tablespoons olive oil
1 medium red onion, finely chopped
Kosher salt
4 garlic cloves, sliced
1 28-ounce can San Marzano tomatoes, with their juice
1 1/2 cups chicken stock
3/4 cup half-and-half
2 tablespoons sriracha sauce
1 teaspoon dried oregano or 1 tablespoon fresh oregano leaves
1/2 cup blue cheese
1. Heat the olive oil in a 4-quart pot over medium heat. When the oil is hot, add the onion and a three-fingered pinch of salt and sweat for 2 minutes. Add the garlic and continue to sweat for 2 more minutes. Add the tomatoes, their juice, and the stock and bring to a simmer. Add the cream, sriracha sauce, and oregano and simmer for 45 minutes.
2. Pour the soup into a blender, add the blue cheese, and blend until smooth, working in batches if needed or blend with an immersion blender. Strain through a fine-mesh strainer into a clean pot, taste, adjust the seasoning is necessary, and reheat to serve. The soup will keep, covered in the refrigerator, for a few days.
Saturday, January 29, 2011
Hippie Rice
The first signature dish I ever had as a kid was Broccoli Bacon Salad, a salad primarily composed of broccoli, dressed with a mayonnaise-based sauce and garnished with (obviously) bacon, sunflower seeds, and raisins. When I was flipping through The Food Matters Cookbook, this recipe stuck out to me because it reminded me of that dish which I made for nearly every family holiday gathering as a child, but is a healthier and more grown-up version. The combination of sweet, soft raisins and fresh, crunchy broccoli (I like mine cooked to crisp-tender) is a surprisingly good one, made even better with the nutty sunflower seeds and kick of heat from the red pepper flakes. This can either be served as a side or turned into a main dish with the addition of chicken or tofu and is great leftover for lunch the following day.
Hippie Rice
adapted from The Food Matters Cookbook by Mark Bittman
1⁄3 cup sunflower seeds
1 cup any long-grain brown rice
Salt
1 head broccoli (about 1 pound), cored and roughly chopped
2 tablespoons olive oil
1⁄2 cup raisins
1⁄2 teaspoon red chile flakes, or to taste
Lemon wedges
1. Put the sunflower seeds in a medium saucepan over medium-low heat and toast, shaking the pan often, until they begin to brown but don’t burn, 5 to 10 minutes. Remove the seeds from the pan and let cool in a big serving bowl.
2. Put the rice in the pan and add water to cover by about 1 inch. Add a pinch of salt and bring to a boil over medium-high heat, then adjust the heat so the mixture bubbles gently. Cover and cook until most of the water is absorbed and the rice is just getting tender, 20 to 30 minutes.
3. Pack the broccoli into the pan on top of the rice—don’t stir; just leave it on top—and add a little more liquid if the water is evaporating too quickly. Replace the lid and continue cooking, adding a small amount of water if the pan boils dry, until the rice and broccoli are both tender, 5 to 10 more minutes. Transfer the rice and broccoli to the bowl with the sunflower seeds and toss with the oil, raisins, and red chile flakes. Taste and adjust the seasoning. Serve immediately or at room temperature with the lemon wedges.
Labels:
broccoli,
brown rice,
raisins,
side dish,
sunflower seeds,
vegan,
vegetarian,
whole grain
Wednesday, January 26, 2011
Chickpea Cakes with Cucumber-Yogurt Sauce
Although I was making veggie burgers on a regular basis, I haven't made anything of the sort in a while, and it's about time that I returned to a recipe of that sort for a satisfying vegetarian entree. I love Veggie Burgers Every Which Way by Lukas Volger, but this time I turned to America's Test Kitchen, a pantheon of culinary knowledge, for this delicious chickpea cake recipe. The beans really fill you up, but the scallions and cilantro keep the flavor light and fresh, complemented by a nuanced flavor from the garam masala whose aroma instantly fills the kitchen as soon as the cakes hit the pan. I served these chickpea cakes in whole wheat pita halves with lettuce and the cucumber yogurt sauce with a nice side salad, but they would also be great served on their own with the sauce or on top of a salad.
Although the recipe calls for peeling the cucumber, I chose not to because I like the extra crunchiness and color that you get from leaving the skin of the cucumber on. On the other hand, seeding, salting, and draining the cucumber is important because otherwise the sauce will be quite watery, even when using Greek yogurt, which is much thicker than regular yogurt. If you don't have time to make fresh bread crumbs, substitute about 1/2 cup purchased bread crumbs, judging how much you need by the texture of the chickpea cake. Although shallots are preferable, minced white or yellow onion can be substituted in its place (keeping in mind that shallots are smaller than onions). Don't let not having the exact ingredients stop you from trying a recipe-you might miss out on a great meal and you may even create an even better dish!
Chickpea Cakes with Cucumber-Yogurt Sauce
from The America's Test Kitchen Healthy Family Cookbook
serves 6
2 slices high-quality white sandwich bread, torn into pieces
1 cucumber, peeled, halved lengthwise, seeded and shredded
Salt and pepper
1 1/4 cups 2 percent Greek yogurt
6 scallions, sliced thin
1/4 cup minced fresh cilantro
2 (15-ounce) cans chickpeas, rinsed
2 large eggs
10 teaspoons olive oil
1 teaspoon garam masala
1/8 teaspoon cayenne pepper
1 shallot, minced
Lime wedges, for serving
1. Adjust an oven rack to the middle position and heat the oven to 350 degrees. Pulse the bread in a food processor to coarse crumbs, about 10 pulses. Spread the crumbs out over a rimmed baking sheet and bake, stirring occasionally, until golden brown and dry, 10 to 12 minutes. Let cool to room temperature.
2. Meanwhile, toss the cucumber with 1/2 teaspoon salt in a colander and let drain for 15 to 30 minutes. Combine the drained cucumbers, 3/4 cup of the yogurt, 2 tablespoons of the scallions, and 1 tablespoon of the cilantro in a bowl and season with salt and pepper to taste.
3. Pulse the chickpeas in a good processor to a coarse puree with large pieces remaining, about 8 pulses. In a medium bowl, whisk the eggs, 2 tablespoons of the oil, garam masala, cayenne, and 1/8 teaspoon salt together. Add the processed chickpeas, breadcrumbs, remaining 1/2 cup yogurt, remaining scallions, remaining 3 tablespoons cilantro, and shallot until just combined. Divide the chickpea mixture into 6 equal portions, about 1/2 cup each, and lightly pack into 1-inch-thick patties.
4. Heat 2 teaspoons more oil in a 12-inch nonstick skillet over medium heat until shimmering. Carefully lay half the patties in the skillet and cook until well browned on both sides, 8 to 10 minutes.
5. Transfer the cakes to a plate and tent loosely with foil. Return the skillet to medium heat and repeat with the remaining 2 teaspoons oil and remaining burgers. Serve with the cucumber-yogurt sauce and lime wedges.
Monday, January 24, 2011
Red Curry Peanut Noodles
I often get very specific food cravings, and I've had a cold peanut noodle bowl on my mind for a while, so I went searching for a recipe, thinking it might make a nice Packer snack to go with the NFC Championship game. It took a lot of self control to wait until 2:00pm to eat lunch for me, but along with a couple of mini spring rolls, this made a delicious accompaniment to the Packers defeat of the Bears. While these noodles are good, they aren't a standout dish in my mind, the lack of heat being one of the key reasons. But it is a good solid dish that is easy and quick to make, healthy, and makes great leftovers for lunch the following day. If I make this again, I'll add a minced jalapeno or Thai chile for heat and more vegetables because I prefer a higher vegetable to noodle ratio in my noodle dishes (although most restaurants and recipes don't agree). Peppers or broccoli would be excellent in this noodle bowl, as would tofu or grilled chicken. This is another one of these recipes I really love because it is so customizable and adaptable, so you can find a combination to please almost anyone.
Red Curry Peanut Noodles
from Food and Wine
serves 4
3/4 pound whole-wheat spaghetti
1/2 cup smooth peanut butter
1 1/2 tablespoons fresh lime juice
1 tablespoon red curry paste
1/3 cup chicken stock or low-sodium broth
1/4 cup plus 2 tablespoons packed cilantro leaves
Kosher salt
1 cup mung bean sprouts (2 1/2 ounces)
2 scallions, white and green parts quartered and thinly sliced lengthwise
1 carrot, coarsely grated
1/3 cup salted, roasted peanuts, coarsely chopped
Lime wedges, for serving
1. In a large pot of boiling salted water, cook the spaghetti until it is al dente. Drain the spaghetti and rinse under cold water until cool. Drain very well.
2. Meanwhile, in a food processor, combine the peanut butter with the lime juice, red curry paste, stock and 1/4 cup of the cilantro leaves and puree. Season the sauce with salt.
3. In a large bowl, toss the spaghetti with the peanut sauce, bean sprouts, scallions and carrot until well coated. Season with salt. Transfer to bowls and sprinkle with the remaining cilantro leaves and the peanuts. Serve with lime wedges.
Labels:
bean sprouts,
carrots,
curry,
noodles,
peanut butter,
peanuts,
whole wheat
Saturday, January 22, 2011
Thai Beef Salad
Now that my winter CSA is over and I've used up nearly all of the produce that came from it, I've been eating salads like crazy. After a few months of eating primarily root vegetables, I'm really craving huge, fresh, crunchy salads. Luckily for me some greens are available at the winter farmer's market, but I have also had to resort to buying greens from other states at the grocery store to satisfy my salad appetite. And while I would happily crunch away on green salads, grilled chicken salads like this or this, or the irresistible combination of dried cranberries, pecans or walnuts, and blue cheese, I wanted to find a new salad to love and inspire me.
The original recipe called for the dressing to be thinned with water; I did not find this at all necessary, although you may, depending on how juicy your limes are. This dressing is a nice balance of tart limes, toasty sesame oil, and heat from the pepper, although the dominant flavor is most assuredly lime, which pairs famously with cilantro. While the savory beef is a great foil to the light, fresh vegetables and dressing, seafood, chicken, or even tofu would also be delicious. Biting into this salad while sitting in the warm afternoon sun was a welcome taste of summer in the cold depths of winter.
Thai Beef Salad
adapted from The Food Matters Cookbook by Mark Bittman
serves 2
8 oz. skirt or flank steak
6 cups mixed salad greens, torn into bite size pieces
1 cup torn fresh mint, cilantro, or Thai basil, or a combination
1/4 cup chopped red onion
1 cucumber, peeled and seeded if you like, and chopped
1 small fresh hot red chile (like Thai) or jalapeno, or to taste, minced (remove seeds to adjust heat)
Juice of 2 limes
1 tablespoon toasted sesame oil
1 tablespoon nam pla (fish sauce) or soy sauce
1/2 teaspoon sugar
1. Prepare a grill or turn on the broiler; the heat should be medium high and the rack about 4 inches from the fire. Grill or broil the beef, turning one or twice, until medium-rare, 5 to 10 minutes total depending on the thickness; set it aside to cool slightly. (You can prepare the recipe up to this point and refrigerate for up to a day; bring the meat to room temperature before proceeding).
2. Toss the lettuce with the herbs, onion, and cucumber. Combine all of the remaining ingredients and toss half of this mixture with the greens. Remove the greens to a platter, reserving the remaining dressing.
3. Thinly slice the beef, reserving its juice; combine the juice with the remaining dressing. Lay the slices of beef over the salad, drizzle the dressing over all, and serve.
Wednesday, January 19, 2011
Creamy Ranch Mashed Potatoes
Mashed potatoes are the ultimate in comfort food and after a dreary, snowy Monday I wanted nothing more than a plate full of comfort. But comfort food doesn't have to a be a nutritional disaster, as proven by this recipe for creamy ranch mashed potatoes from The America's Test Kitchen Healthy Family Cookbook. I had potatoes that needed to be used up as well as an ample supply of garlic and scallions and parsley bought for other recipes, so these potatoes were meant to be in my life. These potatoes are beautifully smooth and creamy with a wonderful freshness and contrast in texture from the scallions and parsley. It takes just a few simple extras to change plain old mashed potatoes into a special side dish that's sure to please the entire family.
Creamy Ranch Mashed Potatoes
from The America's Test Kitchen Healthy Family Cookbook
serves 4
2 pounds russet potatoes (about 4 medium), peeled and sliced 1/2-inch thick
Salt and pepper
1/2 cup 2 percent lowfat milk, warmed
1/3 cup plus 2 tablespoon low fat sour cream
2 tablespoons unsalted butter, melted
3 scallions, minced
2 cloves garlic, minced
2 tablespoons minced fresh parsley
1. Place the potatoes and 1 tablespoon salt in a large saucepan, add enough water to cover the potatoes by 1 inch, and bring to a boil over high heat. Reduce the heat to medium-low and simmer gently until the potatoes are tender but not falling apart (the tip of a paring knife can be slipped into the center of a potato with no resistance), about 15 minutes.
2. Drain the potatoes and return to the saucepan on the still-hot burner. Using a potato masher, mash the potatoes until just a few small lumps remain. Fold in the milk, sour cream, butter, scallions, garlic, and parsley until just incorporated. Season with salt and pepper to taste and serve.
Monday, January 17, 2011
Couscous Salad with Chickpeas, Dried Cranberries, and Pecans
Couscous is one of my favorite grains to cook with because it cooks extremely quickly and is a great blank palette to build a meal on. When browsing through one of my newest acquisitions, The Food Matters Cookbook, I came across this quick and easy couscous salad recipe. Fresh and crunchy carrots are combined with nutty whole wheat couscous, tart and sweet dried cranberries, and rich pecans brought together with a light vinaigrette of lemon juice and olive oil. The original recipe struck me as a side rather than a main dish, so I added a can of chickpeas to turn it into a healthy and satisfying main dish. This can be eaten at room temperature or cold, and makes fantastic leftovers for lunch the following day.
Couscous Salad with Chickpeas, Dried Cranberries, and Pecans
adapted from The Food Matters Cookbook by Mark Bittman
serves 4
1 cup whole wheat couscous
Kosher or sea salt
One 15-ounce can chickpeas, drained and rinsed
2 large carrots, grated
1/2 cup chopped toasted pecans
1/2 cup chopped dried cranberries
1/4 cup chopped scallions
1/4 cup extra-virgin olive oil, or more as needed
Grated zest and juice of one lemon, or more as needed
1 teaspoon ground coriander
Freshly ground black pepper
1/2 cup chopped fresh flat-leaf parsley
1 tablespoon chopped fresh sage or 1 teaspoon dried
1. Put the couscous in a small pot and add 1.5 cups water and a pinch of salt. Bring the water to a boil, then cover and remove from heat. Let steep for at least 10 minutes or up to 20.
2. Put the slightly cooled couscous in a large salad bowl along with the chickpeas, carrots, pecan, cranberries, scallions, olive oil, and lemon zest and juice and sprinkle with spices and salt and pepper. Use 2 big forks to combine, fluffing the couscous and tossing gently to separate the grains. (The salad can be made up to this point and refrigerated for up to a day; bring to room temperature before proceeding.)
3. Stir in the parsley and sage. Taste and adjust the seasoning, moisten with a little more oil and olive juice as you like, and serve.
Labels:
chickpeas,
couscous,
cranberries,
pecans,
vegan,
vegetarian,
whole grain
Saturday, January 15, 2011
Baked Curried Rice with Apples and Coconut
Although I put a number of cookbooks on my Christmas list, The Food Matters Cookbook by Mark Bittman of the New York Times was a surprise gift from my mom. I've considered picking up some of his other cookbooks before, but this is first of his that I've owned. As I do with all new cookbooks I acquire, I went through page by page marking all the recipes I'd like to try. This cookbook is packed with healthy, delicious-sounding recipes and I chose this one to try first because I already had all the ingredients and because it was simple and mostly hands-off, allowing me to get the rest of dinner ready while it baked in the oven.
While this isn't a show-stopper of a dish, it's a solid, easy-to-prepare side and made for a nice accompaniment for a grilled piece of salmon. The fresh cilantro and crunchy apples are nice foils to the nutty brown rice, though I would have liked much more ginger flavor (ginger is one of my favorite flavors) and would add some ground ginger and more fresh ginger next time. If you don't have an oven safe skillet, preheat an oven-safe dish while you cook the rice on the stove and transfer the rice mixture into the baking dish once the rice mixture comes to a boil. This recipe is a great starting point for more brown rice-based sides; I'm also curious to see how well it works in my rice cooker.
Baked Curried Rice with Apples and Coconut
from The Food Matters Cookbook by Mark Bittman
serves 4
2 tablespoons vegetable oil
1 tablespoon curry powder
1 tablespoon minced ginger
1 cup brown basmati rice
Salt and black pepper
One 14-ounce can coconut milk
1/4 cup shredded, unsweetened coconut
2 tart apples, cored and chopped
1/2 cup chopped fresh cilantro
1/4 cup yogurt, optional
1. Heat the oven to 350 degrees F. Put the oil in a large ovenproof saucepan over medium heat. A minute later, add the curry powder and ginger and cook, stirring, for about a minute. Add the rice and some salt and pepper; cook, stirring, until the rice is glossy and translucent, just a minute or two.
2. Measure 1 3/4 cups of the coconut milk; stir it into the rice mixture. Bring to a boil, then cover tightly and transfer to the oven. Bake, undisturbed, for 45 minutes.
3. Meanwhile, put the shredded coconut in a small skillet over medium heat and toast, shaking the pan and stirring often, until it begins to brown, 5 to 10 minutes. Remove the rice from the oven, uncover, and use a fork to stir in the shredded coconut, apples, and cilantro. Replace the lid and let it rest for 10 minutes. Taste and adjust the seasoning and fluff again. Serve immediately or at room temperature, topped with yogurt if you like.
Labels:
apples,
brown rice,
cilantro,
coconut,
curry,
vegan,
vegetarian
Thursday, January 13, 2011
Frozen Peanut Butter Banana Puree
While waiting for my parents to arrive for a visit last weekend, I saw the basis for this recipe on Five Ingredient Fix, a show on Food Network that can be either hit or miss with me. My ears definitely perked up when I heard this recipe because I had a bunch of bananas that needed to be used up and I'm always in the market for a healthy and easy-to-prepare dessert. It drove me nuts that she kept referring to this as ice cream, which I define by inclusion of milk/dairy (or milk substitute like soy, hemp, or almond milk, although I also don't think of that as real ice cream either), but it's also not quite technically a sorbet either. Whatever you call it, it's a pretty healthy and tasty dessert for all the banana lovers out there. I made the banana puree and froze it separately from the walnuts and chocolate chips so they could be incorporated according to each person's preference, but you could also stir them in after the banana, peanut butter, and honey are pureed together. While it isn't a substitute for Ben and Jerry's Chunky Monkey ice cream, this can definitely satisfy a craving for a frozen dessert and make for a sweet, but healthy, treat.
Frozen Peanut Butter Banana Puree
serves 3 to 4
adapted from Food Network
4 medium ripe bananas
2 tablespoons creamy peanut butter
1 to 2 tablespoons
Chopped dark chocolate or chocolate chips (optional)
Chopped toasted walnuts (optional)
1. Slice bananas into 1-inch pieces and freeze. Place frozen bananas chunks in a food processor and puree until smooth. Add peanut butter and honey and process until thoroughly combined. Serve immediately or freeze until ready to eat. Top with chocolate and enjoy!
Labels:
bananas,
dessert,
honey,
peanut butter,
vegan,
vegetarian
Tuesday, January 11, 2011
Red Curry Winter Squash Soup
Red curry paste is a great ingredient to keep around because it makes it easy to add a ton of flavor to a dish with very little effort. Creamy, mildly sweet squash goes extremely well with curry, as does coconut milk, and putting all three together was a wonderful way to use up (almost) the last of my CSA squash.
I added about 1 cup of broth and 4 teaspoons of red curry paste to make a very thick and mildly spicy and very filling dinner for my husband (who doesn't like things too spicy) and myself. If you only add around 1 cup of broth when pureeing the soup you'll have a very thick and creamy soup suitable for a main course for two to three people, but thinned further would make a nice first course soup for four to six people. This soup can also easily be made vegan by sauteeing the onions and garlic in olive oil instead of butter. My husband was a big fan of this soup and told me to make sure to write the recipe down, so this may be making another appearance on our dinner table soon.
Red Curry Winter Squash Soup
serves 2 to 3 (as a main course) to 6 (as a first course)
Canola oil cooking spray
2 medium winter squash, such as acorn or festival squash
1 tablespoon unsalted butter
1 medium onion, diced
2 cloves garlic, finely minced or pressed through a garlic press
One 13.5-ounce can light coconut milk
1 teaspoons red curry paste (or more), to taste
1 cup (or more) low-sodium chicken or vegetable broth or water (enough to achieve desired consistency)
Freshly ground black pepper
Kosher salt
Cilantro, for garnish (optional)
1. Preheat oven to 400 degrees F and spray a baking sheet lined with aluminum foil with canola oil cooking spray. Cut squash in half, scoop out seeds, and season with salt and pepper. Place cut side down on baking sheet and roast until squash is very tender, 30 minutes to 1 hour depending on the size and type of squash, and remove from oven. Once squash is cool enough to handle, scoop out flesh and set aside.
2. While squash is cooling, melt butter over medium heat. Add onion and cook until softened, 5 to 7 minutes. Add garlic and cook until fragrant, about 30 seconds to 1 minute. Add squash flesh, light coconut milk, 1 teaspoon red curry paste, and 1 cup stock and stir to combine. Remove from heat. Using an immersion blender, blend the mixture until smooth. Add broth and blend further to achieve desired consistency-if you stop at this point, you will have a very thick soup suitable for a main course for 2 to 3 people, but soup can be thinned further for a lighter first course soup. Once desired consistency is achieved, add red curry paste, one teaspoon at a time, to taste. Season with salt and pepper and simmer soup for at least 10 minutes to allow the flavors to marry. Serve warm and garnish with cilantro, if desired.
Saturday, January 8, 2011
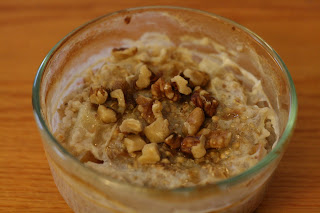
Maple-Pear Baked Steel Cut Oats
I just couldn't get enough Baked Apple and Peanut Butter Steel Cut Oats last weekend and even as I was enjoying them for breakfast last Saturday and Sunday, my mind was already racing with ideas for other baked steel cut oat recipes. While I loved the apple and peanut butter combination, I think I like the maple syrup and pear combination even more. I'm a fool for anything with maple syrup and I've rarely been disappointed by adding it to a dish, so it's no wonder I adore this recipe. This definitely isn't the end of experimenting with this recipe and I look forward to putting together some more creative combinations in the future.
Maple-Pear Baked Steel Cut Oats
serves 1
1/2 whole pear, diced
1/4 cups steel cut oats
1/2 cup milk
1 tablespoon pure maple syrup
1 tablespoon chopped toasted walnuts
1. Preheat oven to 400 degrees. Place diced pears in the bottom of an individual-sized oven proof dish.
2. Pour steel cut oats over the pear, then add milk and bake for 30 minutes.
3. Remove from the oven and top with maple syrup and toasted walnuts. Enjoy!
Thursday, January 6, 2011
Roasted Butternut Squash with Blue Cheese
This recipe used up the last of my CSA butternut squash. While I really like butternut squash and squash in general, it will be nice to mix it up a little bit once I'm finished with all my CSA vegetables (I still have potatoes, onions, garlic, and some festival squash to use up). Keeping with trying to clear out my refrigerator, I put this together using ingredients from ingredients I had around the house in this quick and simple recipe. I like the combinations of red onion and squash (as in Roasted Squash with Red Onion, Oregano, and Mint) and butternut squash and blue cheese (as in Bacon and Butternut Squash Pasta) so I thought I'd throw it all together. A little crumbled bacon would also be nice on top if you have the time to fry up a couple slices you don't mind this dish not being vegetarian, but I like just as is.
Blue cheese and raw red onion are both very strong flavors, and not ones that will likely appeal to kids, so save this for the adults in your life. If you don't like the sharp taste of raw onion, saute it in a bit of olive oil to mellow the flavor and soften the onions before adding it to the squash. You won't have the contrast in textures and the flavor profile will be a little different, but still delicious in a slightly different way. Also, if you don't like blue cheese, feta would also be a good choice for this recipe.
Roasted Butternut Squash with Blue Cheese
serves 2 to 4
1 pound cubed butternut squash (from 2 small or 1 medium squash)
2 teaspoons extra virgin olive oil
1/2 teaspoon kosher salt
1/4 cup crumbled blue cheese (Hook's is amazing if you can find it)
1/2 red onion, very thinly sliced
2 teaspoons red wine vinegar
Kosher salt
Freshly ground black pepper
1. Preheat oven to 400 degrees F. Line a baking sheet with aluminum foil and spray with cooking spray or brush with oil. In a large bowl toss cubed squash with olive oil kosher salt. Spread in an even layer on baking sheets and bake, tossing occasionally, until squash is browned and tender, 15 to 30 minutes, depending on the size of the squash cubes. Remove from oven and transfer to a large bowl or serving dish.
2. While squash is warm add blue cheese, red onion, and red wine vinegar and toss well to distribute evenly. Season to taste with salt and pepper. Allow squash to sit for at least 5 minutes then serve warm or at room temperature.
Labels:
blue cheese,
butternut squash,
red onion,
side dish,
vegetarian
Tuesday, January 4, 2011
Barley Stuffed Acorn Squash
I've eaten a lot of squash since getting my winter CSA, so I'm trying to get creative with recipes to avoid getting completely sick of it, and if I can turn it into a main dish, all the better. I've had a bag of barley since making Barley Soup with Beef and Mushrooms, so I decided to use that as my grain instead of my typical go-to grains of quinoa, couscous, or brown rice. I probably eat a broader range of whole grains than the average person, but I'm still working on expanding the number of kinds of whole grains I have in my diet.
The most dominant flavor in this dish is Parmesan cheese, so pick a high-quality Parmesan (or Parmigiano-Reggiano) and grate it yourself, if possible. I have a block of absolutely delicious Hook's Parmesan which made this dish something special, but this dish is still well worth your time and effort even with Kraft Parmesan. This dish is hearty and healthy without being heavy, with salty and rich cheese, toasty walnuts, fresh parsley and sweet apples providing fulfilling a wide variety of elements of flavor.
Barley Stuffed Acorn Squash
serves 4
2 small to medium acorn squash, halved and seeded
2 teaspoons olive oil
Kosher salt
Freshly ground black pepper
Canola oil cooking spray
3/4 cup pearled barley (not hulled barley), rinsed and drained
1 medium to large onion, diced
4 garlic cloved, minced or pressed through a garlic press
1 cup grated Parmesan cheese
1/2 cup chopped dried apples
2 tablespoons minced fresh flat leaf parsley
2 tablespoons toasted chopped walnuts
1 tablespoon butter
1. Preheat oven to 400 degrees F. Line two baking sheets with aluminum oil and spray with cooking spray. Brush the cut sides of the squash with olive oil and season with salt and pepper to taste. Place squash cut side down on baking sheets and roast until a knife can be slipped into the flesh with no resistance, rotating once during cooking, about 35 to 55 minutes, depending on the size of the squash. Remove squash from oven and increase heat to 450 degrees.
2. Meanwhile, bring 3 quarts of water to a boil. Add barley and 1/4 teaspoon kosher salt and return mixture to boil. Simmer until barley is tender, 25 to 30 minutes. Drain and set aside.
3. Dry saucepan and return to medium heat. Add remaining teaspoon of oil and onion and cook, covered, over medium heat until onion is softened, about 8 minutes. Add garlic and cook until garlic is fragrant, 30 seconds to 1 minute longer. Remove from heat.
4. Off the heat, add cooked barley, 3/4 cup Parmesan, apples, parsley, walnuts, and butter and stir thoroughly to combine. Season with salt and pepper to taste.
5. Divide mixture even among squash halves and top with remaining 1/4 cup Parmesan cheese. Return to oven and bake for 5 to 10 minutes longer, until cheese is melted squash and barley mixture are warm.
Sunday, January 2, 2011
Honey Glazed Carrots with Fresh Mint
Carrots are an absolute staple food for me. I love them raw, roasted, steamed, or glazed with honey, brown sugar, or maple syrup. I was flipping through From Asparagus to Zucchini looking for a quick recipe for a vegetable to go with lunch and came across this easy tweak to a recipe I already make frequently. Fresh mint isn't something I usually have around, but I happened to have some leftover from Roasted Delicata Squash with Quinoa Salad and Roasted Squash with Red Onion, Oregano, and Mint. The savory butter combines with the sweet honey and carrots, punctuated by a touch of freshness from the mint and makes for an easy, but rich-tasting side suitable alongside a simple grilled panini or beautiful roasted piece of meat.
Honey Glazed Carrots with Fresh Mint
adapted from From Asparagus to Zucchini by MACSAC
1 pound carrots
2 tablespoons butter
1 1/2 tablespoons honey
Kosher salt
Freshly ground black pepper
1-2 tablespoons chopped fresh mint
1. Peel carrots and cut into evenly sized rounds or sticks. Combine carrots, butter, honey, and 1/2 cup water in a large skillet over medium-high flame. Bring to a simmer and cook until carrots are tender and most of hte liquid has reduced to a glaze, 10-15 minutes. (Note: if your carrots are cooked through before the liquid has reduced enough, removed the carrots with a slotted spoon and continue cooking until reduced to a glaze. Drizzle the glaze over the carrots and toss to combine).
2. Season carrots to taste with salt and pepper. Sprinkle the mint over the carrots, toss well, and serve.
Saturday, January 1, 2011
Baked Apple and Peanut Butter Steel Cut Oats
I love steel cut oats, but they require significantly more time and effort to prepare than rolled oats or quick oats, so I don't have them very often. (If you've never had steel cut oats before, they are well worth the extra expense over rolled or quick oats.) I've considered making a big batch on the weekend and freezing the rest, but it's just not the same as a steaming bowl of oatmeal fresh off the stove. I was excited to find this recipe because not only was it for individual portions, but it cooks in the oven, freeing me up to make a mocha latte while my breakfast was cooking.
This stick-to-your-ribs breakfast is full of healthy ingredients, but delicious enough that I almost felt like I was getting away with eating a dessert for breakfast. The second I found this recipe my mind already began dreaming up other combinations, so you can be sure you'll see more recipes of this type from me soon. If you've made a New Year's resolution to eat healthier, this is a great recipe to kick off the new year.
Baked Apple and Peanut Butter Steel Cut Oats
from The Tasty Kitchen
serves 1
1/2 whole apple
1/4 cups steel cut oats
1/2 cups milk
1 tablespoon peanut butter
1 tablespoon brown sugar
1 pinch ground cinnamon
1. Preheat oven to 400 degrees.
2. Cut apple into small pieces and place in the bottom of an individual-sized oven proof dish.
3. Pour steel cut oats over the apple, then pour milk over.
4. Bake for 30 minutes.
5. Remove from the oven and top with peanut butter, brown sugar and cinnamon. Enjoy!
Labels:
apples,
breakfast,
peanut butter,
steel-cut oats,
vegetarian,
whole grain
Subscribe to:
Posts (Atom)